I hope to inspire and entertain you with a lot of sewing and a little of everything else!
Photo Tutorial: How to Hoop & Embroider a Onesie
Several people asked me about my method for hooping and machine embroidering a onesie or other tiny shirt. Today I took photos of the process to share with you.
Step 1: Use blue painter's tape to create a frame around your hoop (tape it to the back of the inner hoop.)
Step 2: Hoop 2 layers of woven water soluble stabilizer- this is my preference, but you can use your favorite type of stabilizer. I will be adding a fusible covering to the back at the end, so I don't need stabilizer that stays in even though I am working on a knit.
Step 3: Be sure you are using a BALLPOINT needle- mine was size 80. You need this so your knit doesn't get holes from the embroidery. With just the stabilizer hooped, run your "fix" or "baste" stitch, so that you know the area of the design.
Step 4: See the basting area to show you where your design will go? If the basting goes over the tape, just rip that bit off so you are not stitching over it. I ripped out a bit at the bottom.
Step 5: Turn your onesie completely inside out, even the sleeves.
Step 6: With the front on the bottom, fold down about an inch at the top. Be sure your fold goes straight across the grain.
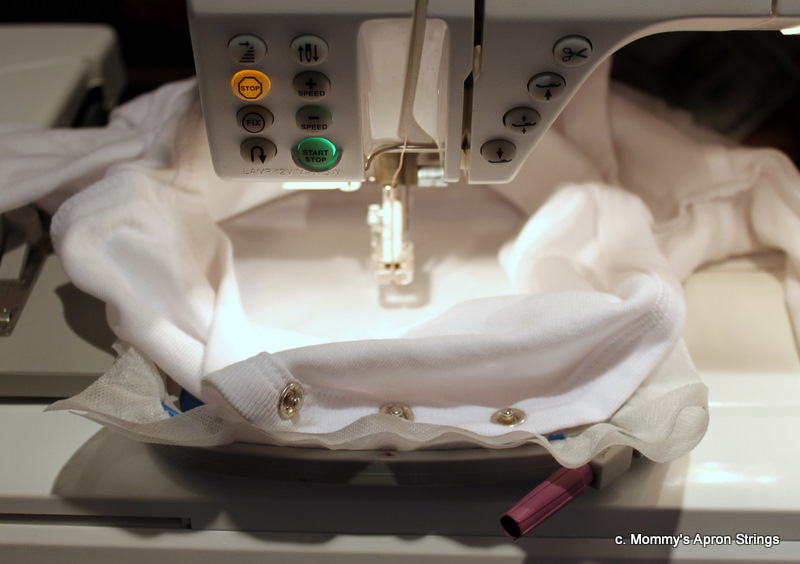
Step 7: Lay the folded onesie on top of your hoop. The fold should go exactly along the top basting row and the onesie must be centered. Lay it on gently, then reach inside and smooth the fabric to stick to all 4 sides. The onesie should not be stretched or bunched up. The fabric should be totally flat and smooth without being stretched at all.
Here's a picture of the onesie stuck to the hoop. The back is facing up and the onesie is inside out.
Step 8: Pull the crotch snap area up to reveal the inside. The fabric that is smooth and stuck to the hoop is the right side of the front of the onesie. This is where your embroidery will go.
Step 9: Attach the hoop to your machine. Be sure the sleeves are not under the hoop. Likewise, be sure any loose fabric is above the hoop. Place a square of clear water soluble stabilizer over your embroidery area and run the "fix" or "basting" area again.
Step 10: Stitch your embroidery design. Stay by your machine and be sure the onesie doesn't get stuck in the stitching. Just keep smoothing the extra fabric out of the way. On a newborn size, you will barely have any leeway around your stitching area and you will probably not be able to do larger than a 4x4 design unless you are on a much larger onesie.
The design stitching out.
Step 11: When you are done stitching, carefully remove the onesie from the hoop. Trim away your "fix" or "basting" threads. Carefully trim the excess stabilizer from front and back. You don't have to be too picky, because the rest will wash out. Send the onesie through a machine was and dry.
Step 12: When your onesie is dry, trim any long bobbin threads and iron the onesie (on the wrong side) so that the embroidery is nice and smooth. Cut a rounded piece of fusible cover to fit over the design plus a little extra. I use the baby interfacing from Farmhouse Fabrics. Floriani Dream Weave Fusible is another good choice. Some of the cheap ones don't stay fused, so don't cut corners here. Iron it to the back of your design. It will make the onesie nice and soft against baby's skin and it looks very finished.
That's it! It is a long tutorial, but once you have done it, it is very easy. Is this how you embroider onesies, too? Let me know what you think of this tutorial.
***Edited to Add: This little pea baby design is a freebie at OPW Members Only Club (free) for January 2012. The little blank area on the leaf was due to my re-sizing of the original, not the fault of the designer, Embroidery Delight. I also removed the pacifier, since none of my kids ever liked them.


15 comments:
wow thanks for the very detail tutorial! this is great!
Asploded, I did this partly because of your comment on my last post. I have been reading through your blog and enjoying it! We have some interests in common. Glad you liked the tutorial- my first!
Your tutorial is wonderful. I just finished the onsie as per your instructions. I will try to send you a photo in a couple of days. Thanks so much. Grandmom
Grandmom,
I'm glad this was helpful and I would love to see pictures of your onesie!
Thank you so much for this very clear tutoril! I am a newbie-machine embroiderer. And with 3 grandchildren in the family, it's great to understand with illustrative pictures how to go around embroidering on a onesie!
Great tutorial!
I do my onsies just like you do, Lisa...they come out perfectly but that ball-point needle is definitely the key! Great tutorial...we'll have you doing more in no time! Thanks for your kind efforts.
Wow! Never seen this method before, it really inspired me to try. Since I've been struggling a lot with al the onesies I embroidered this will certainly help me to reduce stress and frustration.
Thank you very much from the Netherlands!
Marloes
This is great! Thank you so much for posting this! I am expecting my first baby late October, and would love to embroider a Halloween image on a onesie just in case she shows up before the 31st! I can't wait to try this!
Congratulations on your coming baby- there's nothing more wonderful! I hope my tutorial helps you do your onesie and I'd love to see a photo (by email) when you are done- good luck and thanks for your comment.
Thank you for this great tutorial. I found others on YouTube but yours made the most sense and looked easy without leaving anything important out. I was shocked when the onesie I bought came in the mail. It was so small! I remember my baby being that small, I guess. She's 40 now and her diapers were the last ones I changed! So glad you put this out where the "public" can find it. New baby Marco, grandchild of a close friend, will soon be sporting his new onesie. I'll send a pic when it is done...
Thank you for posting this! Someone at my sewing machine repair place showed me but I forgot to take notes and I'd forgotten.
I also LOVE your Painter's Tape trick! I've been using 505 spray which can be messy (and expensive) but this is such a better way I think.
Just wanted to tell you how thankful I am to have found your site! Have just started on monthly onsies for my new grandson and this has been a godsend! Will look for other tutorials on your blog. Thanks again!
Thank you so much. A picture is worth a thousand words. I enjoyed very much. Thanks again.
I tried this for a new granddaughter and was very pleased with the finished product. So glad that I found your site.
Thank you to all of you who took time to comment. I think this is my most popular post ever. Time to re-post it for new people!! Have fun with your embroidery!!
Post a Comment