I hope to inspire and entertain you with a lot of sewing and a little of everything else!

Friday, January 27, 2012

Photo Tutorial: How to Hoop & Embroider a Onesie

Several people asked me about my method for hooping and machine embroidering a onesie or other tiny shirt. Today I took photos of the process to share with you. 
Step 1: Use blue painter's tape to create a frame around your hoop (tape it to the back of the inner hoop.)
Step 2: Hoop 2 layers of woven water soluble stabilizer- this is my preference, but you can use your favorite type of stabilizer. I will be adding a fusible covering to the back at the end, so I don't need stabilizer that stays in even though I am working on a knit.
Step 3: Be sure you are using a BALLPOINT needle- mine was size 80. You need this so your knit doesn't get holes from the embroidery. With just the stabilizer hooped, run your "fix" or "baste" stitch, so that you know the area of the design.
Step 4: See the basting area to show you where your design will go? If the basting goes over the tape, just rip that bit off so you are not stitching over it. I ripped out a bit at the bottom.
Step 5: Turn your onesie completely inside out, even the sleeves.
Step 6: With the front on the bottom, fold down about an inch at the top. Be sure your fold goes straight across the grain.
Step 7: Lay the folded onesie on top of your hoop. The fold should go exactly along the top basting row and the onesie must be centered. Lay it on gently, then reach inside and smooth the fabric to stick to all 4 sides. The onesie should not be stretched or bunched up. The fabric should be totally flat and smooth without being stretched at all.
Here's a picture of the onesie stuck to the hoop. The back is facing up and the onesie is inside out.
Step 8: Pull the crotch snap area up to reveal the inside. The fabric that is smooth and stuck to the hoop is the right side of the front of the onesie. This is where your embroidery will go.
Step 9: Attach the hoop to your machine. Be sure the sleeves are not under the hoop. Likewise, be sure any loose fabric is above the hoop. Place a square of clear water soluble stabilizer over your embroidery area and run the "fix" or "basting" area again.
Step 10: Stitch your embroidery design. Stay by your machine and be sure the onesie doesn't get stuck in the stitching. Just keep smoothing the extra fabric out of the way. On a newborn size, you will barely have any leeway around your stitching area and you will probably not be able to do larger than a 4x4 design unless you are on a much larger onesie.
The design stitching out.
Step 11: When you are done stitching, carefully remove the onesie from the hoop. Trim away your "fix" or "basting" threads. Carefully trim the excess stabilizer from front and back. You don't have to be too picky, because the rest will wash out. Send the onesie through a machine was and dry.
Step 12: When your onesie is dry, trim any long bobbin threads and iron the onesie (on the wrong side) so that the embroidery is nice and smooth. Cut a rounded piece of fusible cover to fit over the design plus a little extra. I use the baby interfacing from Farmhouse Fabrics. Floriani Dream Weave Fusible is another good choice. Some of the cheap ones don't stay fused, so don't cut corners here. Iron it to the back of your design. It will make the onesie nice and soft against baby's skin and it looks very finished.

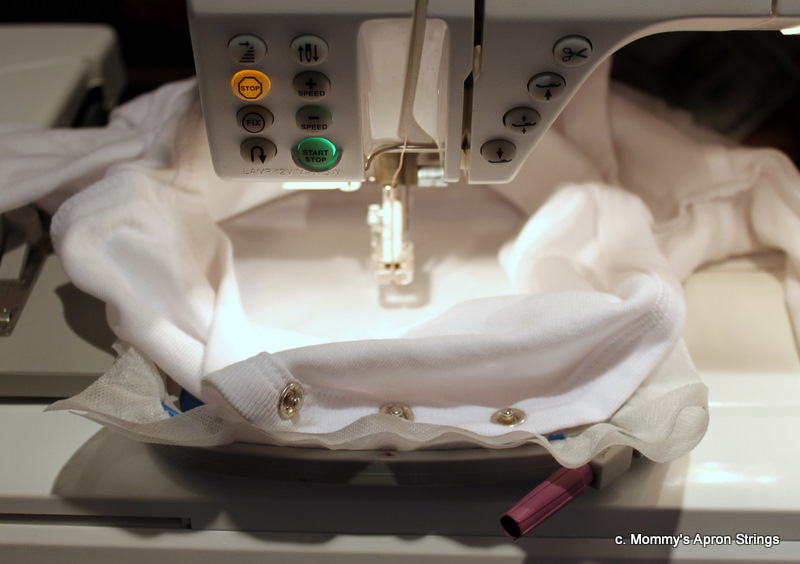
That's it! It is a long tutorial, but once you have done it, it is very easy. Is this how you embroider onesies, too? Let me know what you think of this tutorial.


***Edited to Add: This little pea baby design is a freebie at OPW Members Only Club (free) for January 2012. The little blank area on the leaf was due to my re-sizing of the original, not the fault of the designer, Embroidery Delight. I also removed the pacifier, since none of my kids ever liked them.

Tuesday, January 24, 2012

Good Luck Baby Onesie

I embroidered a onesie for a friend today. She is hoping to have a baby and I want to send her a good luck charm with a letter. I think she'll like this onesie with a baby swinging on the moon. 
The design is Sweet Dream by Windbell. If you like it, it's on sale for only 60 cents right now. They also have several companion designs that are cute, too. It stitched beautifully. The left side of the moon is a bit funky because I forgot my WSS topper, but once I added it, it was fine. It doesn't show up too much.
Tomorrow is a quiet day for me, so I'm hoping to do some more sewing and get this onesie in the mail. See you soon!

Sunday, January 22, 2012

Circa 1919 Romper Modeled

I haven't posted in several days because every day I woke up determined to tackle the buttonholes on this romper and every day I chickened out. Today I worked on them and, as I feared, they were terrible. I will have to pick them out and do something else. I pinned it on Andy so that I could show it and to ask you what type of buttons do you think would look good? I spent a long time looking at buttons and couldn't find any I liked. I considered mother of pearl (too white), leather (dry clean only), wood (too casual), dark Nordic-sweater looking (too military), brown plastic (too plain), brown tortoise-type (too informal), etc. What would you use? 

Anyway, I love everything else about this little romper. I followed an original antique pattern (blogged here), which is a size 2. 
The directions were very minimal, but I had a pretty easy time figuring it out. I drafted the velvet neck trim to match the points on the sleeve cuffs. The fabric is a really soft twill: like flannel, but thicker and with more body. The back is so cute with the drop-seat and it's very full. I think the clothes were made this way to accommodate the thick layers of diapering. I'll have to try it on again with cloth diapers next time. 


I found an antique picture with a similar romper.
Do you notice how puffy the legs are? I wonder what undergarments are hiding under there? I can see why they were able to wear short pants even in winter, because they probably had long woolen undies and stockings underneath.
Please send advice about making buttonholes on a velveteen belt with a thick seam in the way AND what type of buttons would look good??

Tuesday, January 17, 2012

Snuggie for my Little Snuggly Bear

Today I made a very quick project. In fact, it took longer to trace the pattern than it did to sew! When I was at Hobby Lobby last week, I found a McCalls pattern for this little blanket sleeper on sale for 99 cents. Andy doesn't like to sleep with covers and he likes his feet free, but I think he gets cold. When I saw this design with free arms and feet, but warm fleece covering the body, I thought it would be perfect.The pattern comes in sizes 6 months to 4, so I traced the size 2 for Andy, who is 19 months old. After tracing, I held it up to him and it was HUGE. I traced the 6 month size and even that is big on him. I don't know what the pattern drafters were thinking with this one. I tried it on and he seemed to like it. If he sleeps really well tonight, I'll be delighted!


I have finished everything but the 16 buttonholes on the 1919 romper and I'm scared to do them. They will be on the velveteen and I have visions of them stitching wonky. Maybe I'll attempt it tomorrow. I can't wait to show it to you!

Sunday, January 15, 2012

Some Embroideries I've Been Digitizing

Sometimes I work on Embird at night after the kids are asleep. I realized yesterday that I had 5 designs made that I hadn't stitched. I've been testing designs for Juli at Sew Weird, so while I was set up, I stitched out these designs, too. The first one is a vintage baby. I like the way this one turned out. It actually started as a color picture from an old card.
Next up is my favorite: a redwork design of Andy at a day old. I made a photo into a line drawing in Picasa for my base. I used single stitching for the more delicate features and I like the way it came out. Wouldn't it be cute to digitize a picture of each of my babies to put on a quilt?
This vintage bunny would be cute for Easter. Oops...I forgot to trim the jump stitches! I think it would also be good for a bib- maybe with "I Love Carrots" underneath.
Last but not least, this is digitized from a drawing of Andy done by Rosie. He was about 5 months old. I definitely need to get better at eyes!
Rosie wants me to digitize a redwork design of her school to stitch on a t-shirt. That should be challenging, but fun. I also did an owl, but I haven't stitched that one yet.

I am nearly done the 1919 romper. It just needs buttons and buttonholes. I will try to finish tonight and post pictures soon. It turned out very big, but cute.


I am excited to be at 50 followers and I'm putting together a good give away to celebrate!

Tuesday, January 10, 2012

My Foray into Footwear...Yes, I Made Shoes!

If you have read my blog before, then you know that I love all things vintage, especially relating to sewing and babies. I have a strong interest in historical reenactments, but I have never participated in one. It is something I'd like to try someday. I'd also like to take an old-fashioned photo of my 2 youngest boys in historically accurate Edwardian outfits. I'm still working on the 1919 romper for Andy and I have looked at the high button shoes on ebay to go with it. They are very expensive and are often quite worn out. You have to pay over $100 to get really nice ones. So, I thought, I could make him some leather baby shoes. You can find directions for almost anything on the internet, but apparently, there aren't a lot of people making their own shoes! Undaunted, I read my Make Doll Shoes book by Lyn Alexander. She gives excellent directions and has several patterns for doll shoes. I started with a simple button-bar baby shoe pattern from flickr. I had to enlarge it quite a bit for Andy's size 7 foot. I printed the patterns several times and compared the sole to Andy's foot. When it was right, I printed the two pieces and assembled a shoe from paper to be sure they would fit together. I cut up a leather jacket from a yard sale ($1) for my material. (My first attempt a few weeks ago was unsuccessful due to the fact that the "leather" yard sale purse was not leather!) You have to use real leather because it stretches and molds to the foot. I bought a scrap bag of thicker leather pieces at Hobby Lobby to use for the soles.

After I cut out the upper, I machine stitched around the edges for added strength, then I seamed the back and stitched it open flat. I also ran gathering threads around the toe to give it a better shape. You might think that the soles were stitched on, but I followed the method from the Doll's Shoe book and glued the upper to a leather inner sole, then when it was dry, I glued the outer sole to the inner sole. 
 You can see that I still need to add the button to the ankle strap. I am amazed how much these look like little 19th century shoes! I will take pictures of them on Andy when he gets up from his nap and post them tomorrow. This was a really fun project and each shoe only took about 1/2 hour to make. I would like to enlarge the doll pattern for high button boots and make those next. What is the craziest craft project you have ever tried??

Saturday, January 7, 2012

1939 Button on Suit

 I was thrilled to buy a "lot" of vintage boy's clothing last week. It has 2 rompers, 1 button on suit, 1 dress, 1 bib, 1 silk Christening robe and hat, 1 pair of tiny shoes, and 2 white big boy's suits: 1 with shorts and 1 with pants. I bought all of these for only $13! I will share them with you over the next few weeks. 
First up is my favorite from the bunch, a little button on suit in white and aqua. Most of these garments have a "Handmade in Madeira" tag inside. They don't have size tags, but I'm guessing this suit is a size 1, because it barely fit on Andy. It looks good, but I was afraid the crotch would rip if he bent over.

I had a time just getting it on, because it has 16 buttons! Not to mention the time it took to iron. I know I say it all the time, but when did the Mommies of yesteryear have time to do all the housework required of them??
 The trim on the collar is beautiful. It seems like an embroidered Swiss edging with tiny pleats gathering it. I love the aqua edge; it's fancy, but still boyish. I wish this type of trim were still available.
The little tab is embroidered with a horseshoe and 2 horses. The button on pants are not lined, but have a facing at the waist and a hem at the legs. I think this is such a sweet outfit and it looks so precious on Andy!

Wednesday, January 4, 2012

Naptime 1940s Style

Naps (like youth) are wasted on the young. At my age, I really appreciate a good nap. It gives me energy to get through the day and still feel like doing things after dinner. My little Andy resists naps, but he is so cuddly and warm when he finally gives in. Here are 2 patterns from the 1940s that I think are just adorable!
This is what the well-dressed toddler wore to bed in 1944. I think these are the sweetest little jammies. I'm a real sucker for those little footed pants. Don't you love the embroidery? I always marvel how women in the "old days" found time to do such exquisite work with all the household demands of the time.


 Baby's favorite toy might have been made from this pattern. I'm not usually a fan of stuffed animals, but these are hard to resist. I like how they are positioned as if they are sleeping. I'd like to make one of these in a soft velour or cute 30s print.
I have some special vintage garments I want to show you, so come back soon.
I've had a lot of interest in the clothespin bag pattern: it's not to late to request yours!
pinterest-dffa4.html